 CI-700
MODs
CI-700
MODsThe CI700 Clutches
There are 2 types of clutches in the CI700:
* Main-clutches
- engage/disengage the scope from the R/A and DEC shafts, allowing the
scope to be swung by hand.
* Motor-clutches
- engage/disengage the motors from the worm shafts, allowing the worm
shafts to be turned (slow-motion controls).
In factory form both clutch types are prone to a certain amount of slippage. Also, if the CI700 clutches are tightened too much, the axis will bind. These problems result in drive operation that is erratic or too slow.
Many CI700 users overcome these problems by careful balance, and using only light tightening of the MainTitle-clutches. There will be some slippage if you bump the scope or use the faster slew speeds, but you can still track and guide well. Indeed, the original owner of my mount did just that, and claimed to produce over 300 successful images! Other CI700 users, like myself, can't avoid tinkering and have modified the CI700 for better operation.
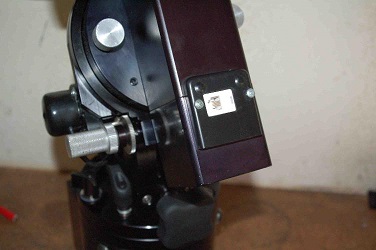
This one is easy. My solution for the motor-clutches is to simply insert some thin paper gasket material between the steel gear and the spacer that are on each of the worm shafts (see pic). This greatly increases the friction between the gear and the spacer when the clutch is engaged. The result is that only light tightening is required to lock the motors to the drives. You can get a sheet of thin paper gasket material at any auto-parts store.
 The
Main-clutch Fix
The
Main-clutch FixThis fix should only be attempted by someone who is handy with tools and brave enough to disassemble their investment (gulp!). It involves replacing the plastic thrust-bushing with a roller thrust-bearing. The result is that the CI700 clutches can be tightened as much as you want and the drives still operate with no binding.
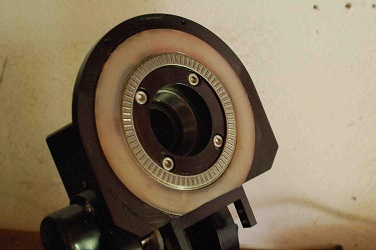
The hard part is removing the "disk-nut" at the bottom of each shaft. This disk-nut is round, 2" wide, 1/4" thick, and threaded onto the shaft to hold everything in place. It is designed to be removed with a special spanner tool - The pegs of the spanner tool fit into the small holes at the bottom of the disk-nut and allow it to be turned. Good luck finding this tool.
I ended up using a hammer and punch to bang on the holes of the disk-nut in a CCW direction to remove it. This caused some marring on the disk-nut, of course. To allow easier tightening/loosening in the future, I drilled out one of the holes and tapped in a small machine screw. Now I can tighten/loosen the disk-nut by tapping on the screw in a CW/CCW direction, making it easier and avoiding damage.
The thrust-bearing I use is the same used by other CI700 users: Torrington #NTA-4860
(see links). The neat thing about this thrust-bearing is that the outside diameter is the same as the inside diameter of the existing plastic bushing - It just drops in place!
Remember - You may be able to avoid of all this tomfoolery by carefully balancing the mount in both axis, only using light tightening of the CI700 clutches, and accepting the fact that there will be some slippage when you slew fast or handle the scope.
 Other
Mods to Make Life Easier
Other
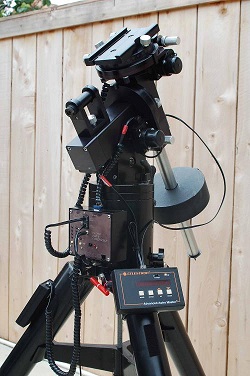
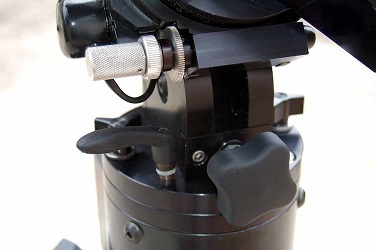
Mods to Make Life EasierThe locking swing-handle in the center-left allows Azimuth adjustment without tools, and can be swung out of the way without changing the adjustment by lifting and turning. Reid #RK-165.
The big knob in front allows Altitude adjustment without tools. It's connected with a 3/8" female coupling pressed over the allen-bolt head, and secured with a set-screw. Reid #RK-35.
 The
DSCs now connect with 6-pin phone-style connectors instead of the
pin-style connectors which are prone to breakage. The phone-style
connectors can be found at most hardware stores, and the covers are
made from a small Radio Shack project box. An indispensable tool for
making cables for this kind of mod is a Modular Plug Crimping Tool.